5 Tips for a Successful Facebook Advertising Campaign
Depending on your industry, Facebook can be a competitive place to spend a portion of your digital marketing dollars. Facebook is very much a pay-to-play environment, but it’s relatively inexpensive; and Facebook’s advertising platform includes not only Facebook, but Instagram and Facebook’s “Audience Network.” A careful evaluation of your market demographic and campaign goals will help you decide if Facebook is your best option.
In marketing, and life in general, answering your “why” before making a decision can really impact the outcome. From restaurant owner to non-profit director, you have to know what you want to gain from your campaign. How would you define the “return” when evaluating your return on investment?
If you don't know where you are going, any road will get you there.
– Lewis Carroll, Alice in Wonderland
Here are a few questions to ask yourself before you get started:
Who do I want to reach?
What message am I trying to convey?
What is my benchmark for a successful campaign?
When you are wanting to truly optimize your Facebook ads, you’re going to have to play in Ad Manager, which can be overwhelming. If you don’t have access to your page’s ad manager account, or if you’re not sure how to find it, here is a step-by-step guide.
1. Choose Your Campaign Objective Thoughtfully
When choosing your campaign objective, it’s helpful to ask yourself what you’re looking to accomplish so you can optimize your campaign based on your objective. Objectives fall under one of these three categories:
Reach – brand awareness/reach
Consideration – traffic, engagement, app installs, video views, lead generation
Conversion – conversions, catalog sales, store traffic
Defining your conversion event before starting your campaign will help you target your audience and create your content. Launching your campaign with intentionality and clarity is absolutely vital.
You’ll need to navigate to Ad Manager by following this structure:
Facebook.com > Manage Ads (upper right hand corner) > Select Ad Account > Create Ad

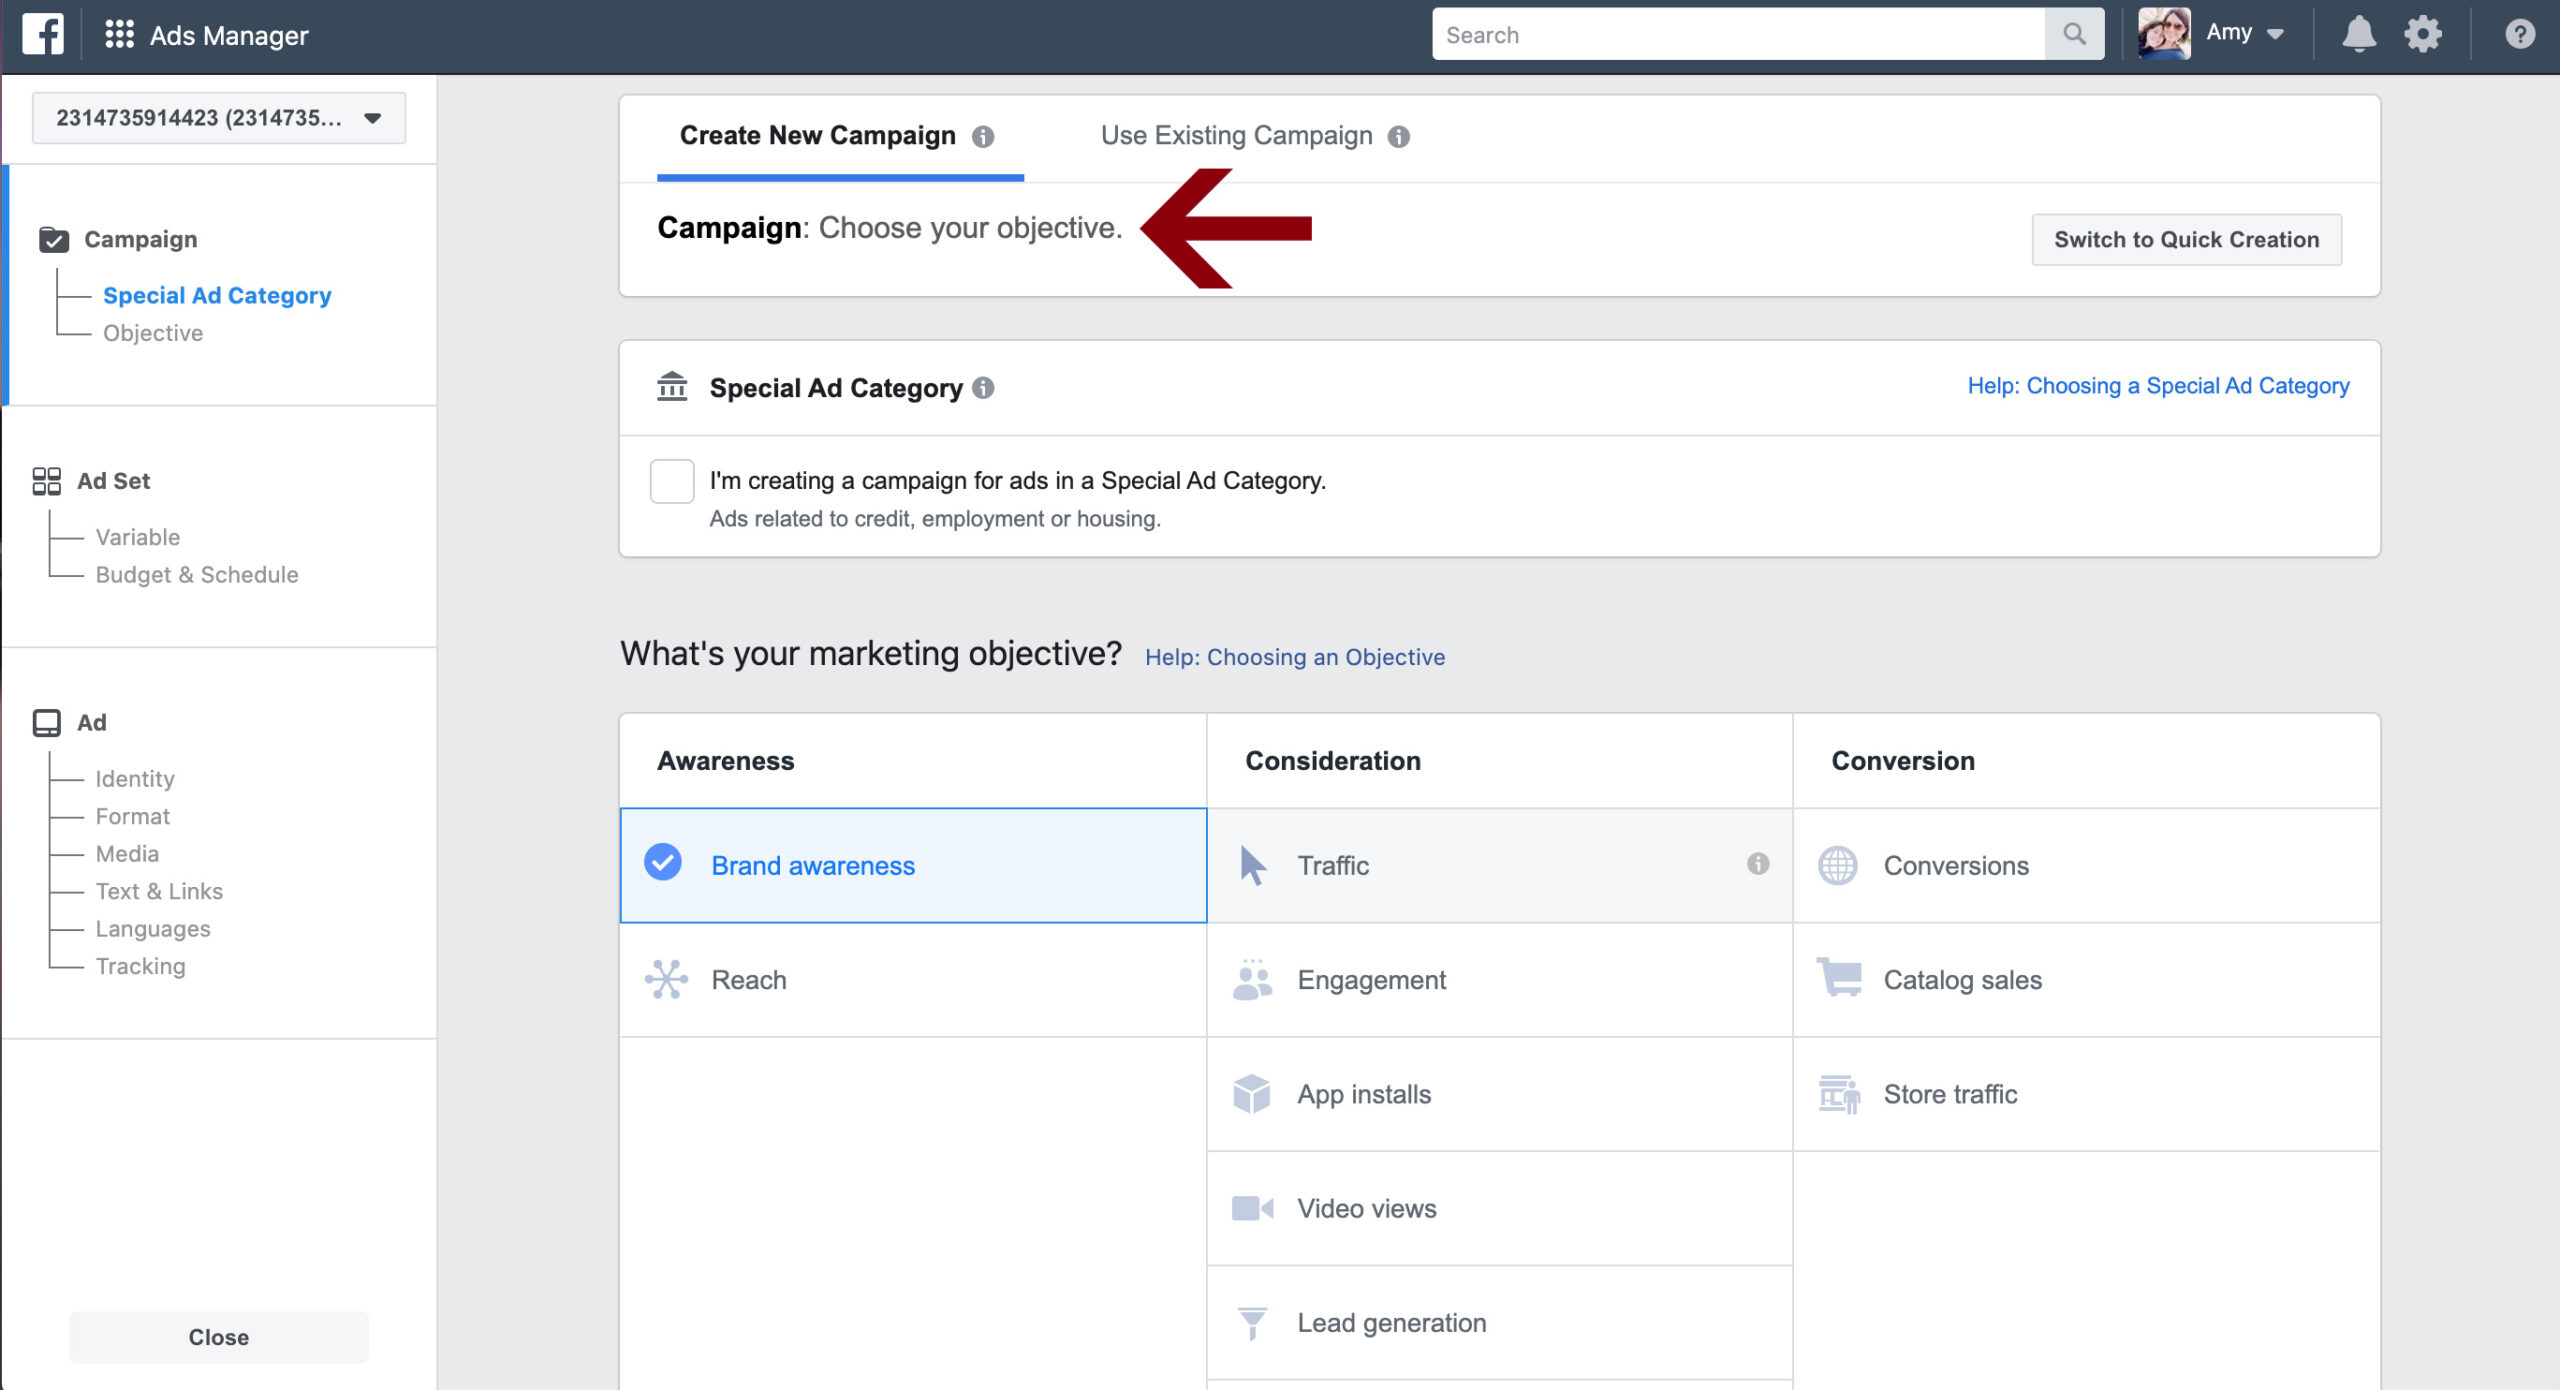
Once you’ve launched Ad Manager by navigating to the upper right hand corner, and selecting your ad manager, you’ll hit the “create campaign” button. Step 1 is to choose your campaign objective – thoughtfully and carefully and intentionally. Define your conversion event – the thing you want people to do – up front and have a clear call to action in mind before you start building your campaign. What do you want people to do when they see your ad? Do you want them to learn more by visiting your website or buy a product or watch a video? Define that first.
You can learn more about the specifics of your ad objectives here.
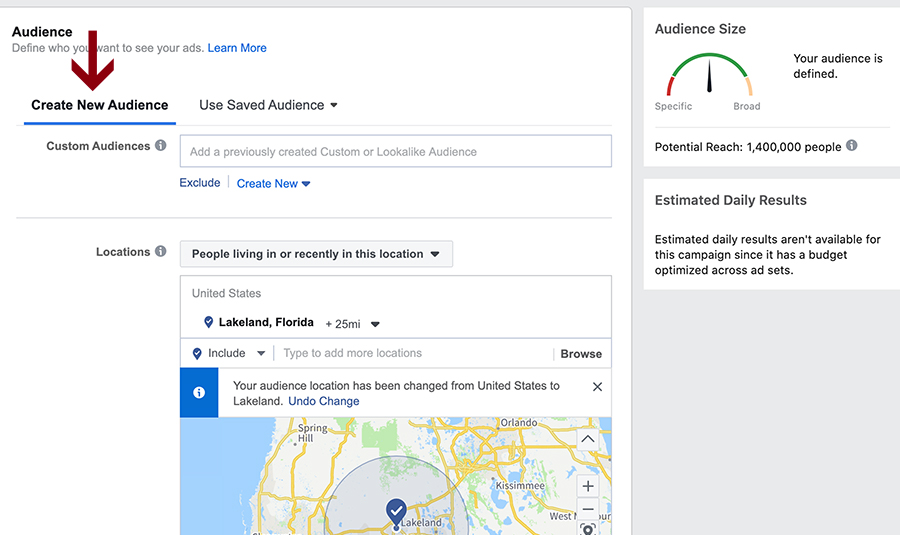
2. Create (and save) Custom Audiences
Creating a custom audience during your first campaign will help you target with laser focus so you minimize your ad spend and increase your ROI. (This is the second step in setting up an ad campaign in Ad Manager.) It’s a great investment of time, since your saved audience can be used again and again if it’s working – and tweaked if it’s not. Facebook has multiple options for creating a custom audience that extend well beyond the standard location, gender, and age options; and the more information you can provide, the higher the odds that Facebook can make solid matches.
Engagement custom audiences allow you to target people who have already interacted with your brand on Facebook or Instagram. It’s worth noting that Facebook acquired Instagram back in 2012, so when you place a Facebook ad, it can also go to Instagram.
Lookalike custom audiences allow you to target people who are similar to people who already interact with your business on Facebook and Instagram.
Website visitor custom audiences require the installation of a tracking pixel on your website, but are a great way to target people who have visited your website previously and have already shown interest and have an awareness of you. Since they already know you exist because they’ve been to your website, this is a great option for a conversion objective. This is how you get the ads on Facebook for a product you were just looking at on the internet. And it’s also a little creepy. I’d typically recommend this custom audience for a sales conversion event.
You can also import your own customer data using automated integration tools like MailChimp. But, you need a minimum of 1000 contacts to take advantage of this feature.
And you can exclude certain audiences, like existing customers who have already converted. This is especially helpful if you’re offering a promotion to new customers and don’t want to upset your existing base.
Once you’ve created your custom audience, be sure to label it appropriately and save it so you can use it again. Don’t be afraid to create and save multiple custom audiences that are developed based on your specific campaign strategy.
Don’t forget to save your custom audience!
You can learn more about custom audiences here.
Be sure to open the “Create New Audience” tab so you can save your audience.
A new window will open to guide you through this set up.
3. Create Quality Content
I HIGHLY recommend creating your content for your Facebook Ad ahead of time – this is not the part that you want to rush through, and doing it well takes some time, creativity, and thought. If you start with your messaging, you can create your graphic elements around your copy.
You’ll want to have the following ready before you get started:
Headline
Ad Text
Link Preview Text
Call to Action (and your target url if your conversion event includes a click-through)
Images/Video
Images or Video:
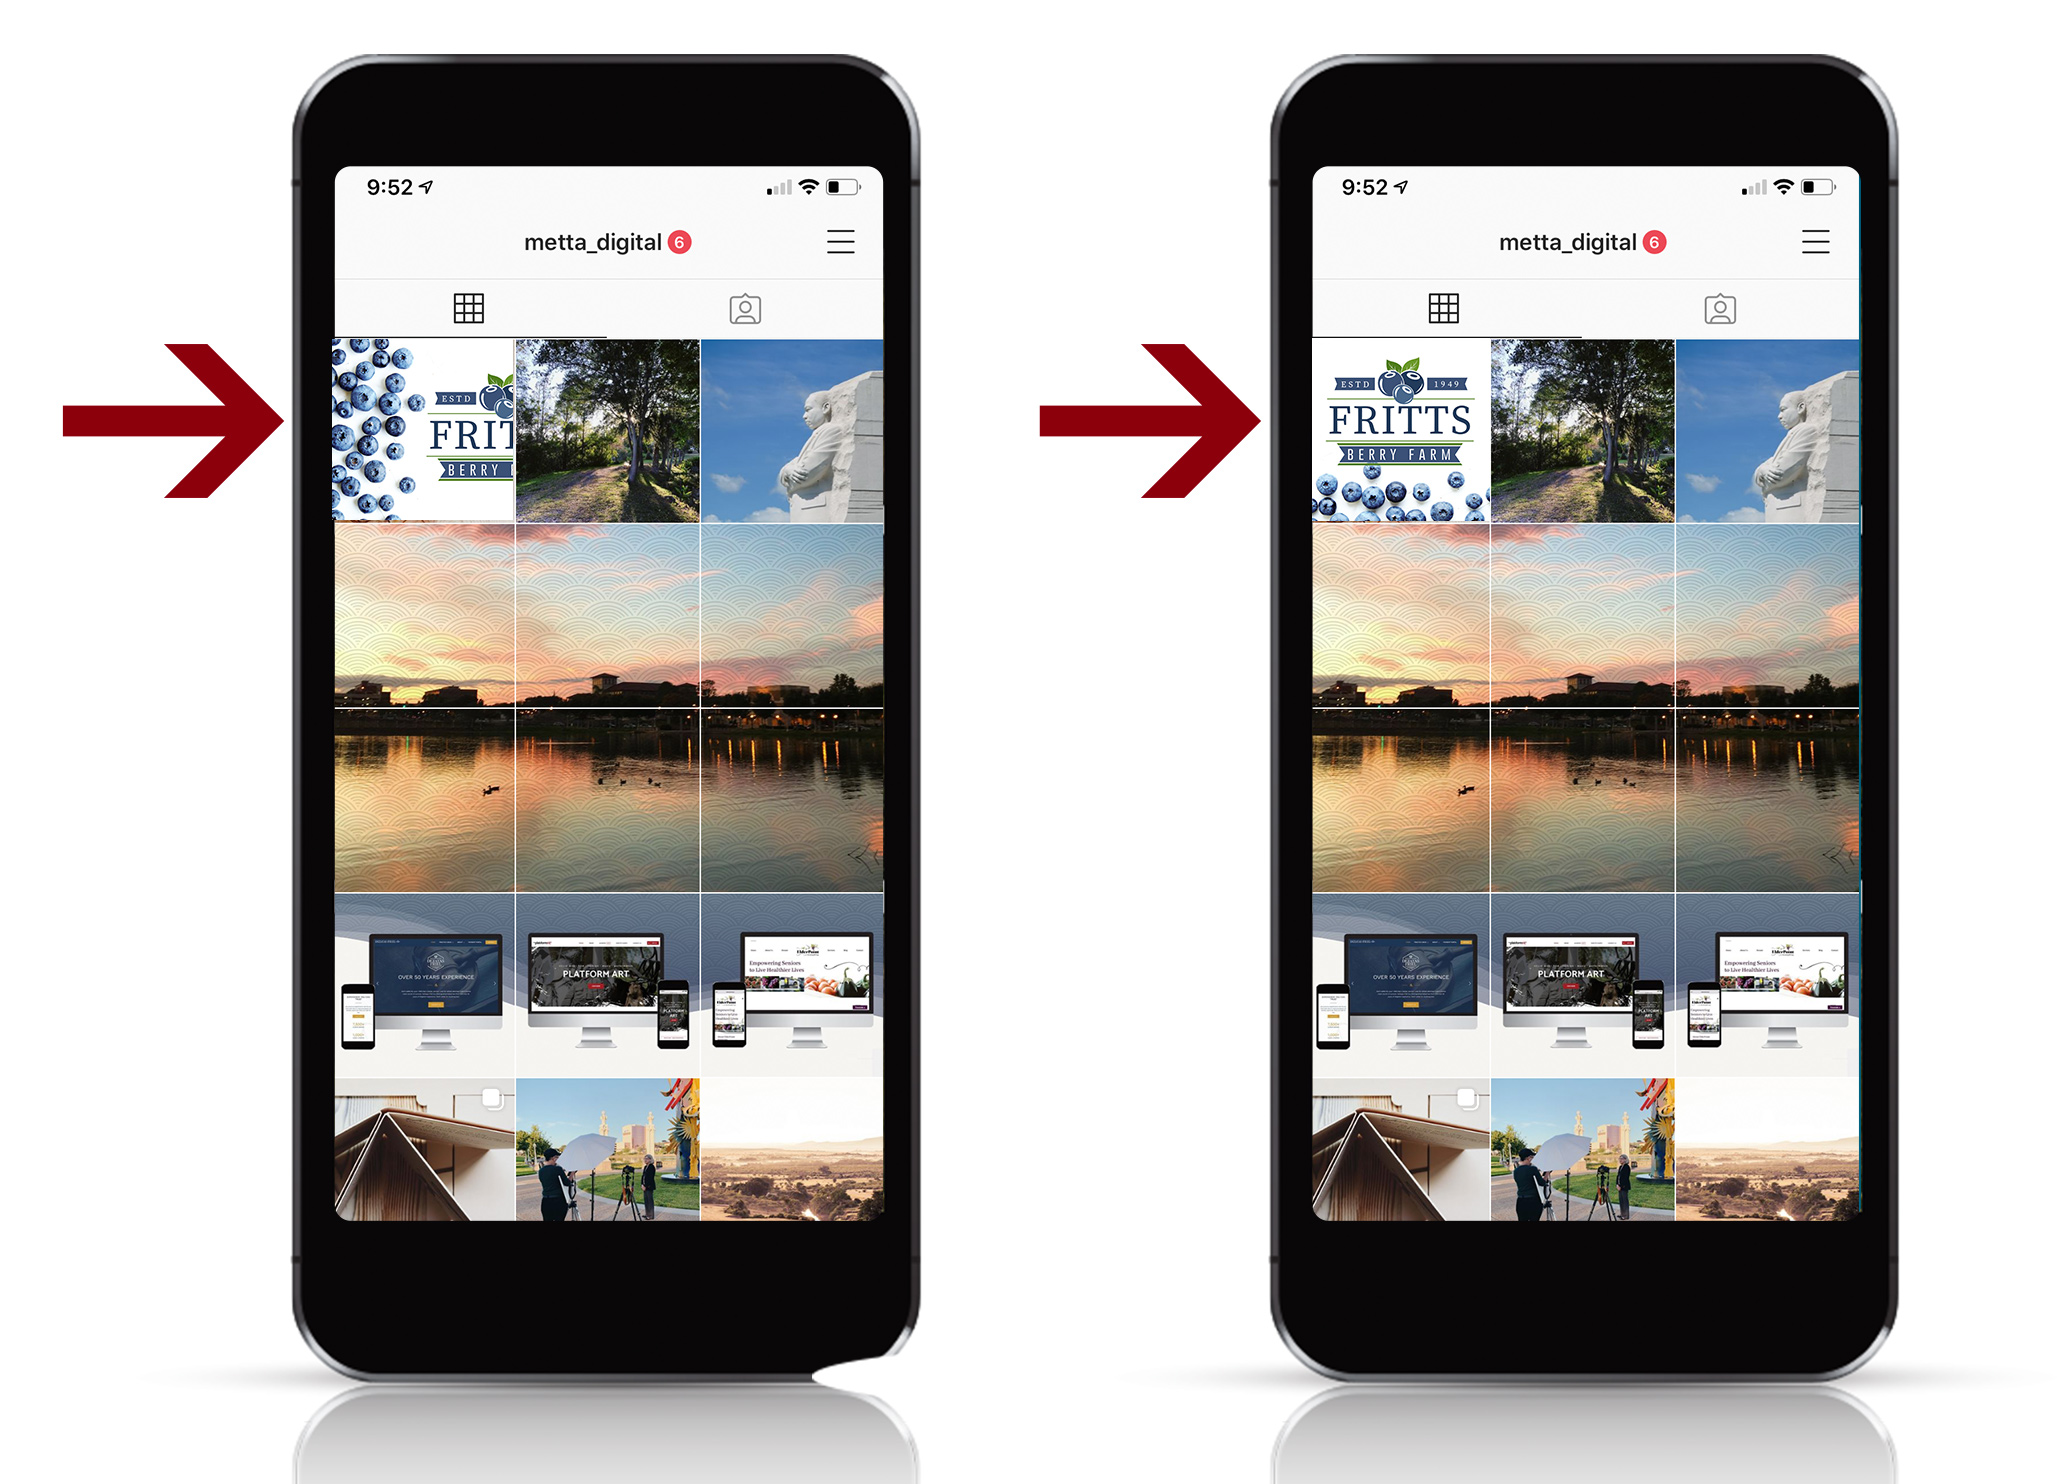
• Be sure your image is sized correctly for the different displays. It’s worth a few extra minutes to create multiple graphics, if needed. One cropped square for Instagram, horizontal version for Facebook, and a vertical copy for Instagram and Facebook Stories – this is especially true if your image contains text. If you’re running short on time, select an image that won’t be impacted by square cropping and crop it square for Instagram in Creator Studio or before uploading.
• Facebook does not like text on images, so keep your text to under 20% if you’re going to use it for an ad.
• Be sure you have the proper permissions for your images – purchase the appropriate usage rights using Adobe Stock (my personal favorite for the price point and amount of images), Shutterstock, etc. or (better yet) use your own photos. Grab all your images at once, so you can stay in your creative work flow.
• Consider Gifs, videos, and Canvas ads in addition to images – GIFs fall somewhere in between images and videos – short, to the point, and quicker to make (and watch). While more labor intensive and time-consuming, data shows that 53% of users that open a Canvas ad view at least half of it, and the average view time per ad is 31 seconds. View an overview and step-by-step guide here.
• “Ad fatigue” is a real issue, so be sure you change up your creative at least every two weeks. If you’ve culled and prepared all your images at the start, this will be less difficult.
- Image ads: Size: 1,200 X 628 pixels. Ratio: 1.91:1. Text: 90 characters. Headline: 25 characters. Link description: 30 characters.
- Video ads: Format: .mov or .mp4. Ratio: 16:9. Resolution: at least 720p. File size: 2.3 GB max. Thumbnail size: 1,200 x 675 pixels. Text: 90 characters. Headline: 25 characters. Link description: 30 characters.
- Carousel ads: Image size: 1,080 x 1,080 pixels. Image/video ratio: 1:1. Text: 90 characters. Headline: 40 characters. Link description: 20 characters.
- Slideshow ads: Size: 1,289 x 720 pixels. Ratio: 16:9, 1:1, or 2:3. Text: 90 characters. Headline: 25 characters. Link description: 30 characters.
4. Run an A/B Campaign
A/B (or split) Campaigns allow you to test the performance of two similar ads using different variables. If you have a large campaign on the horizon, a series of A/B tests will allow you to keep drilling down so that you can optimize a higher-spend campaign.
Use A/B Test Campaigns to test ad designs (colors, images, etc), offers, headlines, most engaged audience, best call-to-action, and more.
You can create an A/B Campaign the same way you would a regular campaign in Ad Manager:
Upper left hand corner > manage ads > choose ad account if needed
Create Ad > Choose Objective > Brand Awareness > A/B Test > Test Creative
You can test the following variables. I chose to test the display type for this example – single image vs. carousel.:
Audience, Creative, Placement
After choosing your variable, you’ll set your A/B test budget & schedule (you can choose to end your campaign early if a clear winner is identified) and create your ads. I split my ad budget equally between the two ads. The duration of your ad is up to you, but I recommend at least a week if you have that kind of time to spare and don’t need the data sooner.
Remember, don’t change too many variables at once or your data won’t be helpful. If you change the image, ad type, and headline it will be difficult to know which variable impacted your ad’s performance.
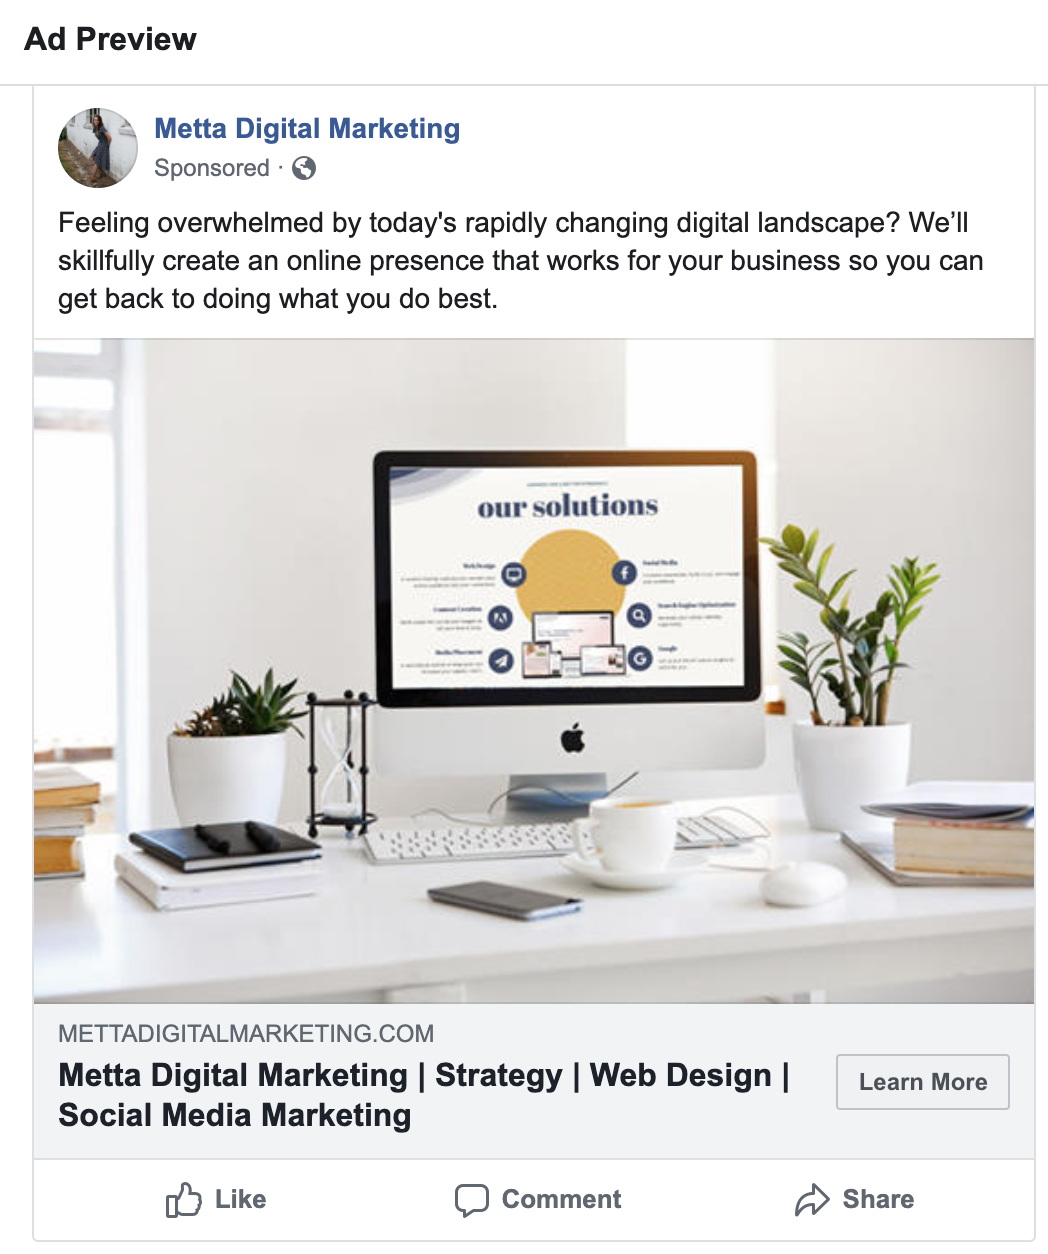
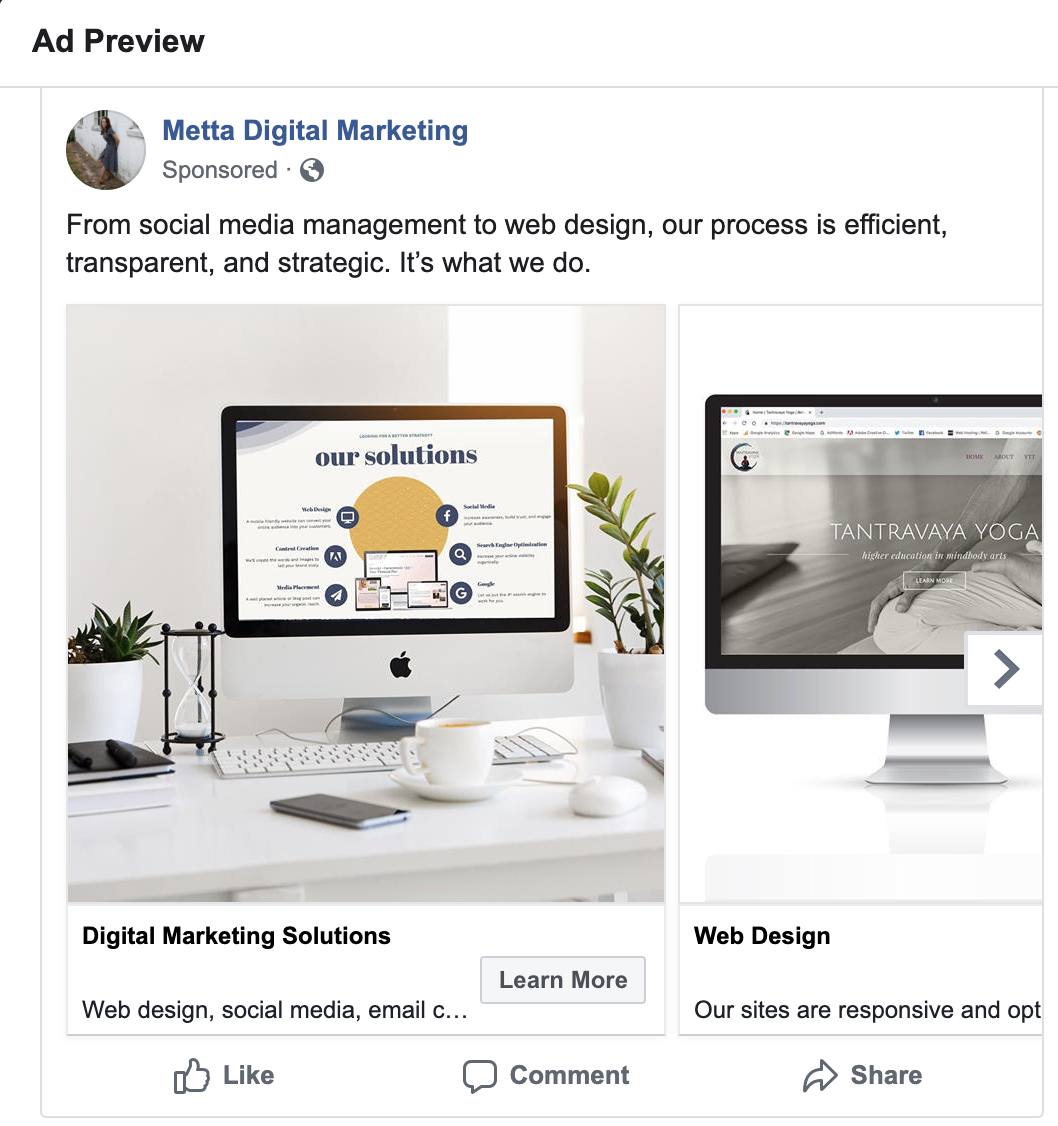
(Be sure to give your ads an identifiable name. I labeled mine Ad A – Single Image and Ad B – Carousel.)
Ad A: Identity: Choose page for Facebook & Instagram
Choose Format – Single Image Slideshow or Carousel
Text & Links – Take your time here.
Ad B: Carousel – Same as above, plus set a separate image, headline, description, and url (if applicable) for each image.
The Ad Creator is pretty intuitive – just remember, when creating a carousel ad, to take the time to specify a different title, description, and url for each image in your carousel.
I created a single image ad and a carousel ad, but I’ve had great results with slideshow ads, too.
Variable selection information can be found here.
Ad A – Single Image
Ad B – Carousel
5. Evaluate your Paid and Organic Data and Adjust
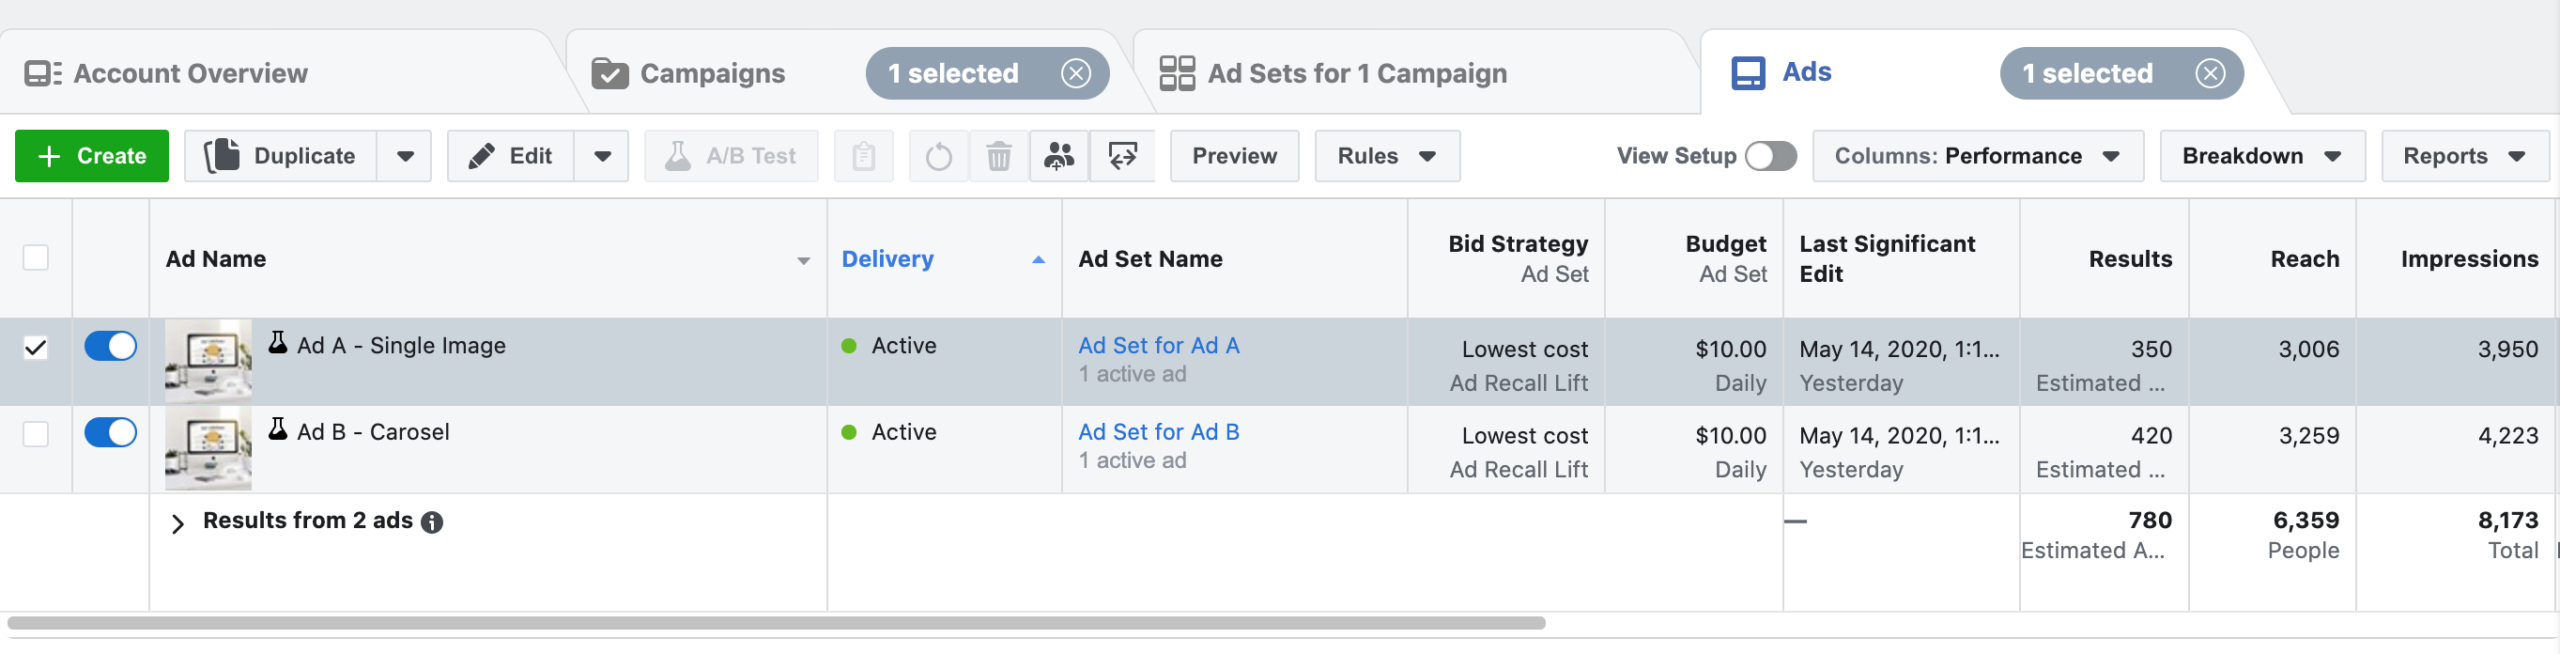
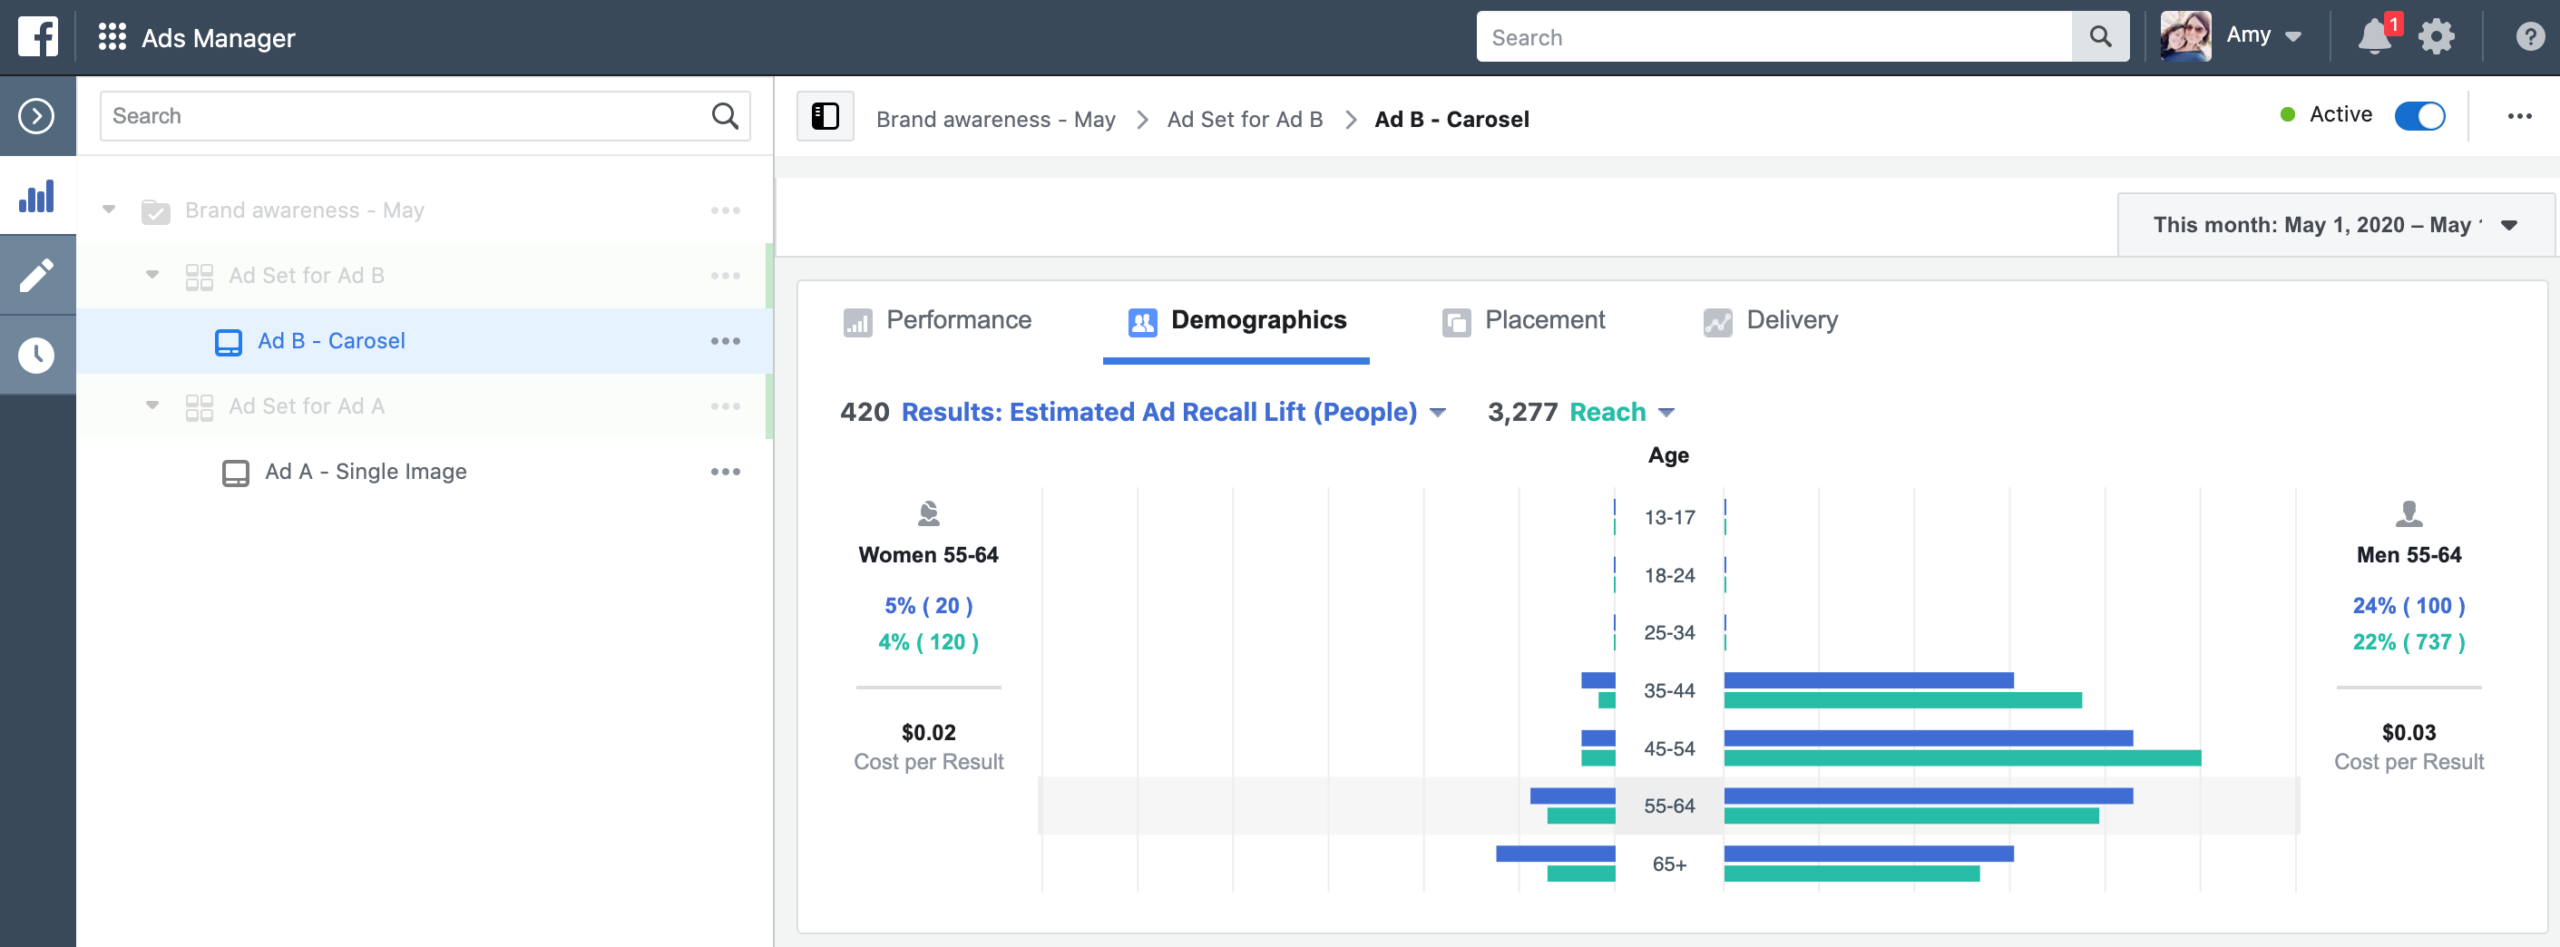
Once you’ve completed an A/B campaign, be sure to drill down in your results panel to see how each ad performed and what demographic it resonated with the most. From your campaign’s results panel, you can also view the placement and delivery of your ad.
When you’re evaluating your data in the regular insights panel, pay attention to the organic and paid reach metric. If you have a $10 budget and you want to simply boost a post, give it a few hours after posting and see how it’s performing organically. A post that performs well organically will likely perform well as an ad. Facebook will send you a notification to you to let you know which posts are your top performers.
Which posts have the most engagement? Which posts are resulting in your desired conversion action? Which posts are largely ignored?
After you’ve evaluated your data, be sure to make adjustments and don’t be afraid to run a series of A/B campaigns – especially if you have a major campaign with a large budget on the horizon. What you learn from your A/B campaign will be extremely valuable when you have a higher budget on the line.
Aggregate data analysis info can be found here.
Bonus tips…
Bonus tips…
Take your time to create quality content that your followers will find creative, fun, or valuable. Ideally, your message will resonate with your followers which will increase brand loyalty and engagement.
Don’t make every post a sales pitch. Don’t be afraid to ask questions, answer questions, share valuable information, and have fun. Also be sure to monitor the comments so that your space is a safe space for your users.
Link Facebook and Instagram in Creator Studio – but I still don’t recommend automatically pushing Facebook posts to Instagram, because I like to customize my captions, too. (Hashtags, for example, are relevant on Instagram, but not so much on Facebook. And url’s are great in Facebook, but are un-clickable in Instagram captions.)
Facebook and Instagram stories are a great way to get content in front of a larger audience without over populating your feed. Events and promotions are the perfect opportunity to create a Facebook or Instagram story and allow you to push out time-sensitive content. They’re also less of a commitment – they don’t take as long to create and they’re only visible for 24 hours. From fun stickers to gifs to text (and even swipe up links if you have enough followers), have fun with these and use the opportunity to highlight the different layers of your organization.
Create clear messaging and website copy that you can use on multiple platforms.